Embed and customize styling
Modify the CSS of your web chat and embed it within a page
Customization and configuration
As you can see in the default snippet code available in your Web Chat agent's integration page, we use the chat.load() function to load a agent by setting the project ID, the runtime URL and a version ID.
Below is an example of the default code snippet.
window.voiceflow.chat.load({
  verify: {
    projectID: "<ID>"
  },
  url: "https://general-runtime.voiceflow.com",
  versionID: "production"
});
You can add additional settings on top of the above configuration to further customize the Web Chat experience for your users.
Embed the Webchat in a Page
To embed the Webchat within a section of your page rather than the default overlay mode, you can add the following to the webchat installation code.
Important:You must indicate the HTML element ID that the embedded webchat should attach too. If you do not specify an element, it will look for and attach to any element with the ID voiceflow-chat-frame. If no element with that ID is found, then the widget will revert into the default overlay mode.
render.modecan be set tooverlayorembedded. When inoverlaymode, chat will ignore any target passed. Otherwise, the chat will mount into the target via Shadow DOM treating the target element as a host.render.targetshould be a validHTMLElementwhich will be the host element of the chat (aka the chat tree will be mounted into the target, treating it as a container. If no target was provided, the chat will try to find a valid HTML element withvoiceflow-chat-frame idto attach itself to it.autostart: defaults totrueinrender.mode: 'embedded'and tofalseinrender.mode: 'bubble'.Unless the session has been previously started and can be retrieved from your storage of choice, a new session will not be started ifautostart: false.
/**
* [optional] Embed webchat within a section of your page
*/

render: {
	mode: 'embedded',
	target: document.getElementById('flat-chat'),
},
autostart: false,
Known Issue: when you refresh the page, if autostart:false the session will be still active.
Example
/**
* [optional] Embed webchat within a section of your page
*/


window.voiceflow.chat.load({
  verify: {
    projectID: "<ID>"
  },
  url: "https://general-runtime.voiceflow.com",
  versionID: "production",
  render: {
		mode: 'embedded',
		target: document.getElementById('flat-chat'),
	},
	autostart: false
});
Custom CSS: Override agent settings and styles
The below can be used to override the listed agent configuration settings. You can also add a link to your self-hosted stylesheet.
If you use custom CSS to style your Web Chat, target elements that begin with .vfrc. You can find the list of classes in our react-chat repository on GitHub.
/**
* [optional] override configured agent definitions on integrations tab
*/

assistant: {
  title: "string",
  description: "string",
  image: "string",
  // color: "string",
  stylesheet: "string" //link to your self-hosted stylesheet
}
Example
/**
* [optional] override configured agent definitions on integrations tab
*/

window.voiceflow.chat.load({
  verify: {
    projectID: "<ID>"
  },
  url: "https://general-runtime.voiceflow.com",
  versionID: "production",
	assistant: {
  	title: "string",
  	description: "string",
  	image: "string",
  	// color: "string",
  	stylesheet: "string" //link to your self-hosted stylesheet
	}
});
If you don't want to host your css stylesheet, you can also convert your CSS into a data URL. Here is an example of a full widget using that method. This CSS turns the agent messages black.
<script type="text/javascript">
  (function(d, t) {
      var v = d.createElement(t), s = d.getElementsByTagName(t)[0];
      v.onload = function() {
        window.voiceflow.chat.load({
          verify: { projectID: 'PROJECT_ID' },
          url: 'https://general-runtime.voiceflow.com',
          versionID: 'production',
          assistant: {
            stylesheet: "data:text/css;base64,LnZmcmMtc3lzdGVtLXJlc3BvbnNlIC52ZnJjLW1lc3NhZ2UgeyBiYWNrZ3JvdW5kLWNvbG9yOiAjMDAwMDAwOyBjb2xvcjogI0ZGRkZGRjsgfQ==" // link to your self-hosted stylesheet
          }
        });
      };
      v.src = "https://cdn.voiceflow.com/widget/bundle.mjs";
      v.type = "text/javascript";
      s.parentNode.insertBefore(v, s);
  })(document, 'script');
</script>
Proactive text message bubbles
Create custom proactive text messages to draw attention to your Web Chat agent.
proactive.clear() clears any previous proactive messages.
proactive.push(...messages) renders one or more proactive text messages:
// one message
window.voiceflow.chat.proactive
  .push({ type: 'text', payload: { message: 'hello world' } })

// multiple messages
window.voiceflow.chat.proactive
  .push(
    { type: 'text', payload: { message: '1!' } },
    { type: 'text', payload: { message: '2!' } }
  )
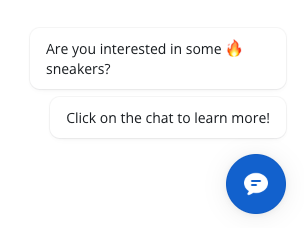
For example, you can render a proactive message bubble when your customer reaches a particular page on your website:
<script>
...
  window.voiceflow.chat.load({ ... }).then(() => {
    if (window.location.href.includes('https://store.com/products/fire_sneakers') {
      window.voiceflow.chat.proactive.clear(); // clear all previous messages
      window.voiceflow.chat.proactive.push({
        type: 'text',
        payload: { message: 'Are you interested in some 🔥🔥🔥 sneakers?' }
      }, {
        type: 'text',
        payload: { message: 'Click on the chat to learn more!' }
      })
    }
  })
...
</script>
Here is a full example of using it within your widget:
<script type="text/javascript">
  (function(d, t) {
      var v = d.createElement(t), s = d.getElementsByTagName(t)[0];
      v.onload = function() {
        window.voiceflow.chat.load({
          verify: { projectID: 'PROJECT_ID' },
          url: 'https://general-runtime.voiceflow.com',
          versionID: 'production'
        }).then(() => {
          window.voiceflow.chat.proactive.clear(); // clear all previous messages
          window.voiceflow.chat.proactive.push({
            type: 'text',
            payload: { message: 'Are you interested in some 🔥🔥🔥 sneakers?' }
          }, {
            type: 'text',
            payload: { message: 'Click on the chat to learn more!' }
          });
        });
      };
      v.src = "https://cdn.voiceflow.com/widget/bundle.mjs";
      v.type = "text/javascript";
      s.parentNode.insertBefore(v, s);
  })(document, 'script');
</script>
Updated 9 months ago
