Documentation Index
Fetch the complete documentation index at: https://docs.voiceflow.com/llms.txt
Use this file to discover all available pages before exploring further.
Extensions let you add custom functionality to your web chat widget. You can render interactive elements like file uploads, date pickers, or payment forms directly in the chat window, or trigger effects elsewhere on your site like updating a status icon or running custom scripts.
Extension types
There are two types of extensions:
Response extensions render interactive widgets inside the chat window. Use these for file uploads, calendar pickers, custom forms, or any UI element users interact with during the conversation.
Effect extensions don’t render anything in the chat, but trigger actions elsewhere on your site. Use these for deep-linking users, updating page elements, or running custom scripts based on conversation events.
How extensions work
Extensions are triggered by a Function step in a workflow. You define the extension in your site’s JavaScript, then register it in your chat.load() configuration. The action name must match across your extension code and your Voiceflow steps.
Response extension structure
const MyResponseExtension = {
name: 'ExtensionName',
type: 'response',
match: ({ trace }) => trace.type === 'Custom_Action_Name' || trace.payload?.name === 'Custom_Action_Name',
render: ({ trace, element }) => {
// Create and append your custom UI to 'element'
// Optionally return a cleanup function
}
};
Effect extension structure
const MyEffectExtension = {
name: 'ExtensionName',
type: 'effect',
match: ({ trace }) => trace.type === 'Custom_Action_Name' || trace.payload?.name === 'Custom_Action_Name',
effect: ({ trace }) => {
// Run your custom logic here
}
};
Registering extensions
Register your extensions in the assistant.extensions array when loading the widget:
window.voiceflow.chat.load({
verify: { projectID: 'YOUR_PROJECT_ID' },
url: 'https://general-runtime.voiceflow.com',
assistant: {
extensions: [MyResponseExtension, MyEffectExtension]
}
});
There’s no limit to the number of extensions you can register.
Example: building a form extension
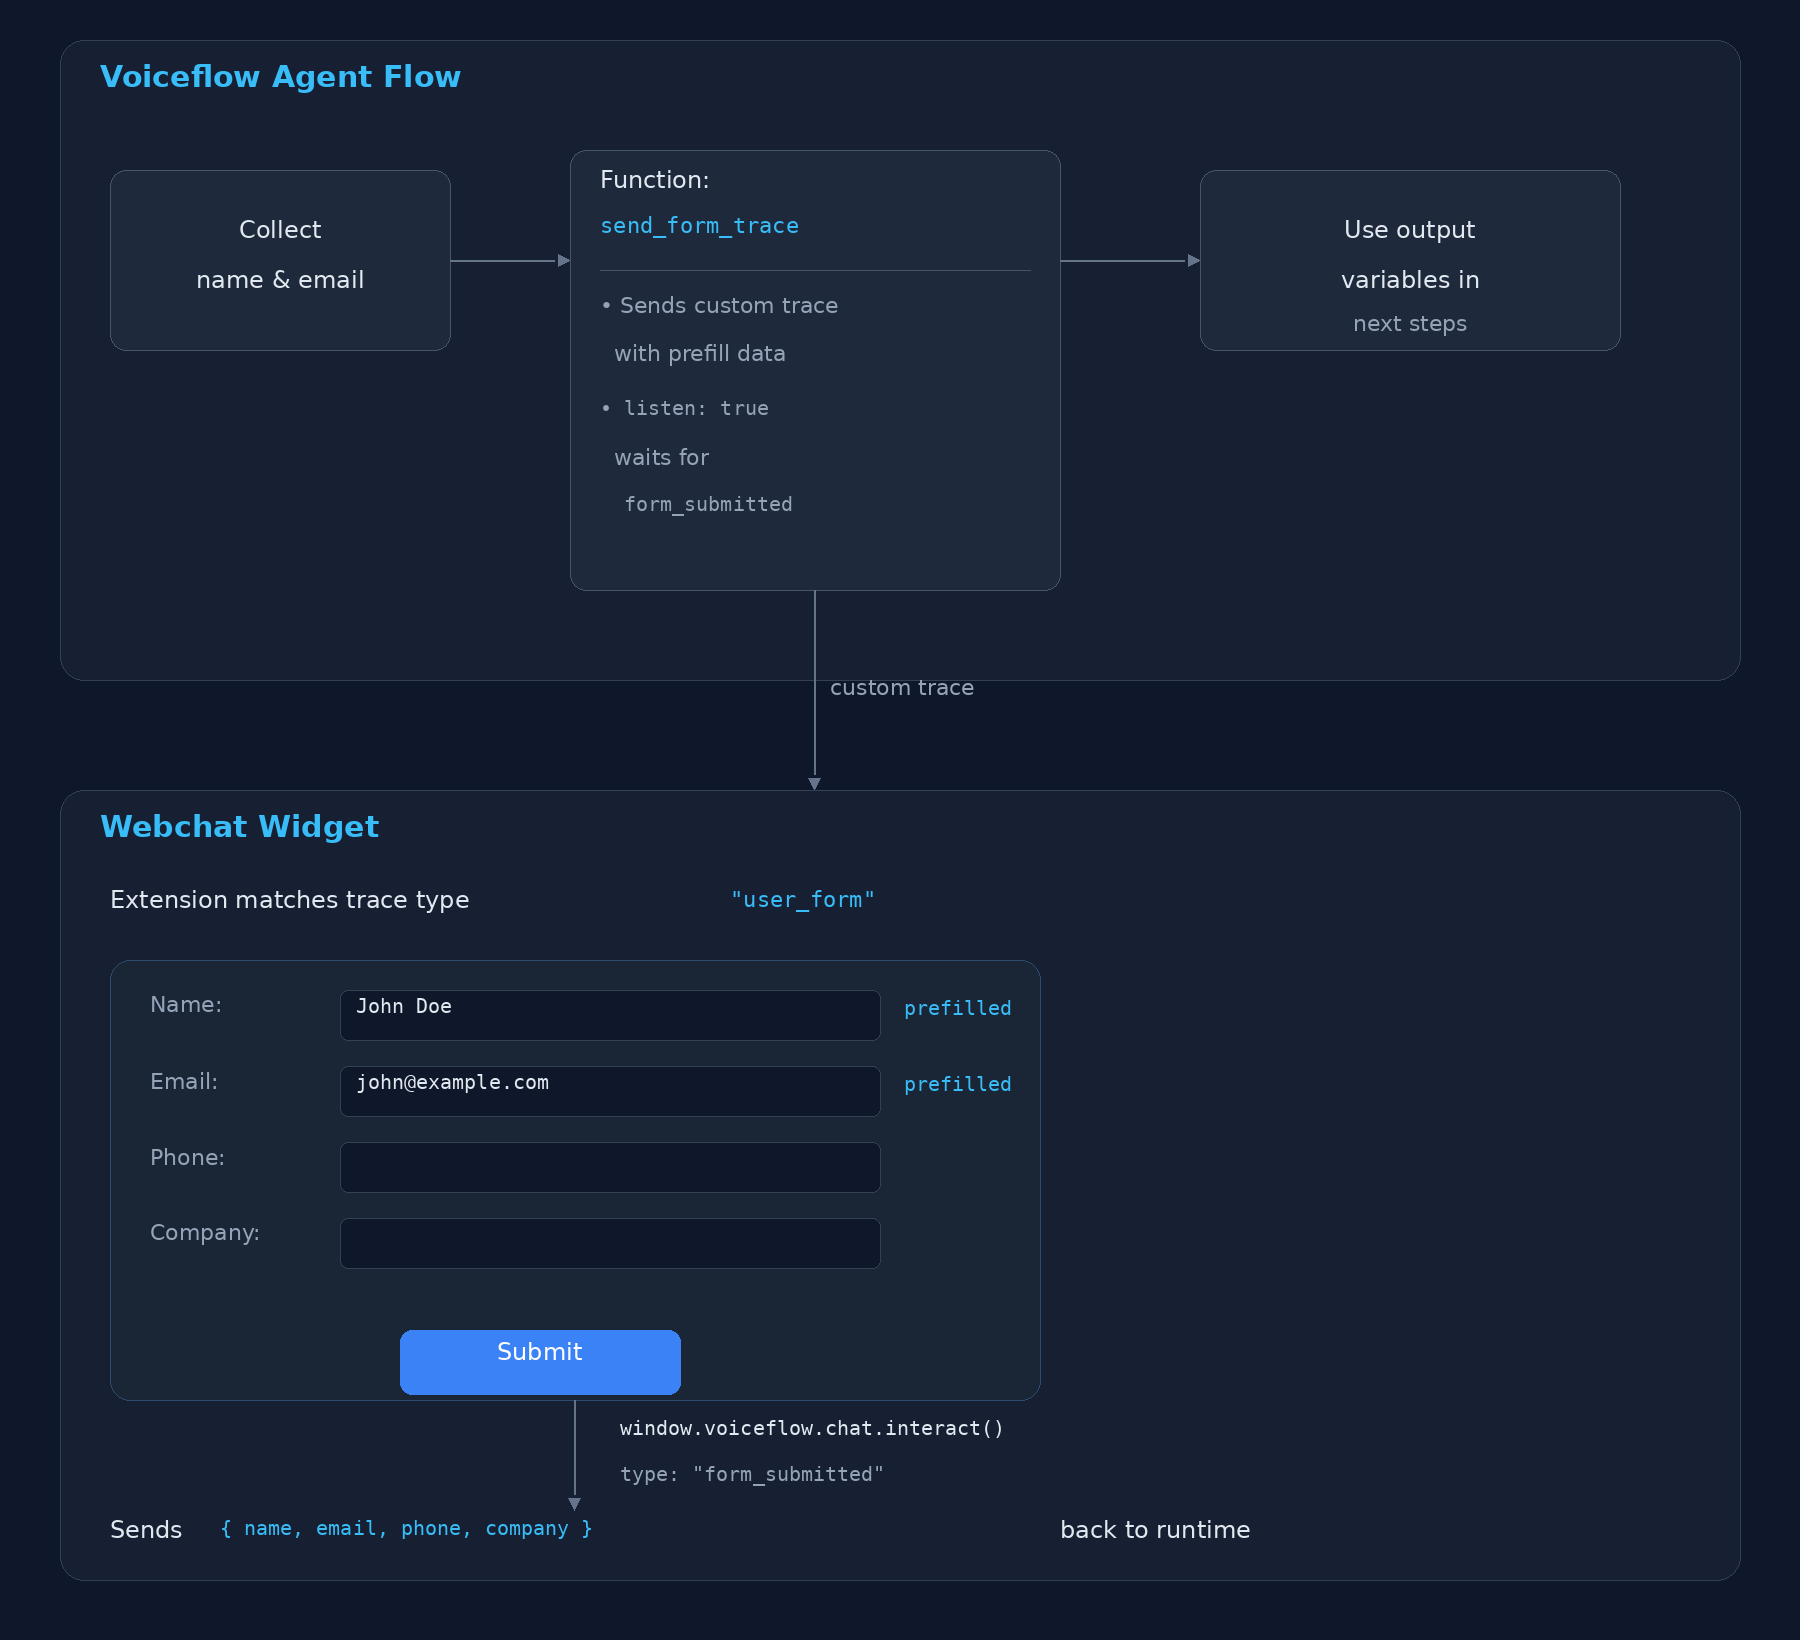
Build a webchat extension that renders a pre-filled form, triggered by a Voiceflow function. The function sends user data (name, email) via a custom trace, the extension renders the form and collects missing fields, and submits the completed data back to the function which routes based on the response.
Architecture
Step 1: The Voiceflow Function
Create a function in Voiceflow that accepts name and email as input variables, emits a custom trace to trigger the extension, and listens for the form submission.
Function Configuration
| Setting | Value |
|---|
| Name | Send Form Trace |
| Input Variables | name (string), email (string) |
| Output Variables | form_name, form_email, form_phone, form_company |
| Paths | submitted, default |
Function Code
export default async function main(args) {
const { name, email } = args.inputVars;
return {
trace: [
{
type: 'user_form',
payload: {
name: name || '',
email: email || '',
},
},
],
next: {
listen: true,
to: [
{
on: { 'event.type': 'form_submitted' },
dest: 'submitted',
},
],
defaultTo: 'default',
},
};
}
What this does:
- Reads
name and email from the function’s input variables (collected earlier in the flow).
- Emits a trace with
type: 'user_form' — this is the custom trace type the webchat extension will match against.
- Sets
listen: true so the agent pauses and waits for the user to interact.
- Routes to the
submitted path when it receives an event with type: 'form_submitted'.
Step 2: The Webchat Extension
Register a response extension that matches the user_form trace, renders a form pre-filled with the payload data, and sends the completed form back via interact().
Extension Code
const FORM_FIELDS = [
{ name: 'name', label: 'Name', type: 'text', prefilled: true },
{ name: 'email', label: 'Email', type: 'email', prefilled: true },
{ name: 'phone', label: 'Phone', type: 'tel', placeholder: '(555) 123-4567' },
{ name: 'company', label: 'Company', type: 'text', placeholder: 'Acme Inc.' },
];
const FORM_STYLES = `
.vf-form {
display: flex;
flex-direction: column;
gap: 12px;
padding: 16px;
font-family: sans-serif;
}
.vf-form label {
display: flex;
flex-direction: column;
gap: 4px;
font-size: 13px;
font-weight: 500;
color: #333;
}
.vf-form input {
padding: 8px 12px;
border: 1px solid #ddd;
border-radius: 6px;
font-size: 14px;
outline: none;
transition: border-color 0.15s;
}
.vf-form input:focus { border-color: #387dff; }
.vf-form input.error { border-color: #e74c3c; }
.vf-form button {
padding: 10px 16px;
background: #387dff;
color: #fff;
border: none;
border-radius: 6px;
font-size: 14px;
font-weight: 600;
cursor: pointer;
margin-top: 4px;
}
.vf-form button:hover { background: #2f68db; }
.vf-form button:disabled { background: #ccc; cursor: not-allowed; }
`;
function createFormField(field, prefillData) {
const label = document.createElement('label');
label.textContent = field.label;
const input = document.createElement('input');
input.type = field.type;
input.name = field.name;
input.required = true;
if (field.prefilled && prefillData[field.name]) {
input.value = prefillData[field.name];
}
if (field.placeholder) {
input.placeholder = field.placeholder;
}
label.appendChild(input);
return label;
}
const FormExtension = {
name: 'UserForm',
type: 'response',
match: ({ trace }) => trace.type === 'user_form' || trace.payload?.name == 'user_form',
render: ({ trace, element }) => {
const prefillData = trace.payload || {};
const style = document.createElement('style');
style.textContent = FORM_STYLES;
const form = document.createElement('form');
const container = document.createElement('div');
container.className = 'vf-form';
FORM_FIELDS.forEach((field) => {
container.appendChild(createFormField(field, prefillData));
});
const button = document.createElement('button');
button.type = 'submit';
button.textContent = 'Submit';
container.appendChild(button);
form.appendChild(style);
form.appendChild(container);
form.addEventListener('submit', (event) => {
event.preventDefault();
const data = {};
let valid = true;
FORM_FIELDS.forEach((field) => {
const input = form.querySelector(`input[name="${field.name}"]`);
const value = input.value.trim();
input.classList.toggle('error', !value);
if (!value) valid = false;
data[field.name] = value;
});
if (!valid) return;
button.disabled = true;
form.querySelectorAll('input').forEach((input) => {
input.disabled = true;
});
window.voiceflow.chat.interact({
type: 'form_submitted',
payload: data,
});
});
element.appendChild(form);
},
};
Register the Extension
Add it to your chat.load() call:
window.voiceflow.chat.load({
verify: { projectID: 'YOUR_PROJECT_ID' },
url: 'https://general-runtime.voiceflow.com',
assistant: {
extensions: [FormExtension],
},
});
Step 3: Capture the Data in the Agent Flow
When the user submits the form, interact() sends an event with type: 'form_submitted' and a payload containing { name, email, phone, company }. The function’s listen picks this up and routes to the submitted path.
To access the submitted data downstream, use a Code step (or a second function) connected to the submitted path:
// In a Code step after the "submitted" path
const name = last_event.payload.name;
const email = last_event.payload.email;
const phone = last_event.payload.phone;
const company = last_event.payload.company;
Alternatively, if using the function’s output variables, create a second function on the submitted path that reads last_event and maps values to output variables:
export default async function main(args) {
const { last_event } = args.inputVars;
return {
outputVars: {
form_name: last_event.payload.name,
form_email: last_event.payload.email,
form_phone: last_event.payload.phone,
form_company: last_event.payload.company,
},
next: { path: 'success' },
};
}
Step 4: Wire the Agent Flow
The overall canvas layout:
- Before the function, collect
name and email.
- Wire those variables into the function’s input variables.
- Connect the
submitted output path to a Code step or a Function that reads last_event.payload.
- Use the extracted variables in subsequent steps or back in your agent.
Complete Working Example
Two files: form.js with the extension, and index.html that loads it.
const FORM_FIELDS = [
{ name: "name", label: "Name", type: "text", prefilled: true },
{ name: "email", label: "Email", type: "email", prefilled: true },
{ name: "phone", label: "Phone", type: "tel", placeholder: "(555) 123-4567" },
{ name: "company", label: "Company", type: "text", placeholder: "Acme Inc." },
];
const FORM_CSS = [
".vf-form { display:flex; flex-direction:column; gap:12px; padding:16px; font-family:sans-serif; }",
".vf-form label { display:flex; flex-direction:column; gap:4px; font-size:13px; font-weight:500; color:#333; }",
".vf-form input { padding:8px 12px; border:1px solid #ddd; border-radius:6px; font-size:14px; outline:none; transition:border-color 0.15s; }",
".vf-form input:focus { border-color:#387dff; }",
".vf-form input.error { border-color:#e74c3c; }",
".vf-form button { padding:10px 16px; background:#387dff; color:#fff; border:none; border-radius:6px; font-size:14px; font-weight:600; cursor:pointer; margin-top:4px; }",
".vf-form button:hover { background:#2f68db; }",
".vf-form button:disabled { background:#ccc; cursor:not-allowed; }",
].join("\n");
function createFormField(field, prefillData) {
const label = document.createElement("label");
label.textContent = field.label;
const input = document.createElement("input");
input.type = field.type;
input.name = field.name;
input.required = true;
if (field.prefilled && prefillData[field.name]) {
input.value = prefillData[field.name];
}
if (field.placeholder) {
input.placeholder = field.placeholder;
}
label.appendChild(input);
return label;
}
const FormExtension = {
name: "UserForm",
type: "response",
match: function (ctx) {
return ctx.trace.type === "user_form";
},
render: function (ctx) {
const prefillData = ctx.trace.payload || {};
const style = document.createElement("style");
style.textContent = FORM_CSS;
const form = document.createElement("form");
const container = document.createElement("div");
container.className = "vf-form";
FORM_FIELDS.forEach(function (field) {
container.appendChild(createFormField(field, prefillData));
});
const button = document.createElement("button");
button.type = "submit";
button.textContent = "Submit";
container.appendChild(button);
form.appendChild(style);
form.appendChild(container);
form.addEventListener("submit", function (event) {
event.preventDefault();
const data = {};
let valid = true;
FORM_FIELDS.forEach(function (field) {
const input = form.querySelector('input[name="' + field.name + '"]');
const value = input.value.trim();
input.classList.toggle("error", !value);
if (!value) valid = false;
data[field.name] = value;
});
if (!valid) return;
button.disabled = true;
form.querySelectorAll("input").forEach(function (input) {
input.disabled = true;
});
window.voiceflow.chat.interact({
type: "form_submitted",
payload: data,
});
});
ctx.element.appendChild(form);
},
};
index.html
<!DOCTYPE html>
<html lang="en">
<head>
<meta charset="UTF-8" />
<meta name="viewport" content="width=device-width, initial-scale=1.0" />
<title>Form Extension Demo</title>
</head>
<body>
<h1>Form Extension Demo</h1>
<script src="form.js"></script>
<script type="text/javascript">
(function (d, t) {
var v = d.createElement(t), s = d.getElementsByTagName(t)[0];
v.onload = function () {
window.voiceflow.chat.load({
verify: { projectID: 'YOUR_PROJECT_ID' },
url: 'https://general-runtime.voiceflow.com',
assistant: {
extensions: [FormExtension],
},
});
};
v.src = 'https://cdn.voiceflow.com/widget-next/bundle.mjs';
v.type = 'text/javascript';
s.parentNode.insertBefore(v, s);
})(document, 'script');
</script>
</body>
</html>
How the Data Flows
| Step | Where | What Happens |
|---|
| 1 | Agent flow | Name and email collected into variables |
| 2 | Function | Emits user_form trace with { name, email } payload; sets listen: true |
| 3 | Webchat | Extension matches trace, renders form pre-filled with name and email |
| 4 | Webchat | User fills in phone and company, clicks Submit |
| 5 | Webchat | interact({ type: 'form_submitted', payload: { name, email, phone, company } }) |
| 6 | Function | listen receives form_submitted event, routes to submitted path |
| 7 | Agent flow | Code step or Function reads last_event.payload to populate variables |
Key Concepts
Why listen: true?
Setting listen: true in the function’s next command pauses the agent at the function step. Without it, the agent would immediately continue down the defaultTo path before the user has a chance to fill out the form.
Event Matching
The to array uses MongoDB-style queries (via sift.js) to match incoming events. { 'event.type': 'form_submitted' } matches any interact() call where type equals 'form_submitted'. You can also match on payload properties:
to: [
{
on: {
'event.type': 'form_submitted',
'event.payload.company': { $exists: true },
},
dest: 'submitted',
},
]
Accessing Submitted Data
After the listen resolves, the event that triggered it is available as last_event in downstream Code steps:
// last_event structure
{
type: 'form_submitted',
payload: {
name: 'John Doe',
email: 'john@example.com',
phone: '(555) 123-4567',
company: 'Acme Inc.',
},
}
Extension Cleanup
The render function can return a cleanup function that runs when the message is removed from the chat (e.g., on session reset):
render: ({ trace, element }) => {
const form = buildForm(trace.payload);
element.appendChild(form);
return () => {
form.remove();
};
},
More examples
For additional extension examples including video embeds, maps, input field controls, and confetti animations, visit the sample extensions repository
This example walks through creating a form that collects name, email, and phone number from users.
Step 1: Create the extension
Add this script above your web chat widget snippet, before the closing </body> tag:
<script>
const FormExtension = {
name: 'Forms',
type: 'response',
match: ({ trace }) =>
trace.type === 'Custom_Form' || trace.payload?.name === 'Custom_Form',
render: ({ trace, element }) => {
const formContainer = document.createElement('form');
formContainer.innerHTML = `
<style>
label {
font-size: 0.8em;
color: #888;
}
input[type="text"], input[type="email"], input[type="tel"] {
width: 100%;
border: none;
border-bottom: 0.5px solid rgba(0, 0, 0, 0.1);
background: transparent;
margin: 5px 0;
outline: none;
padding: 8px 0;
}
.phone {
width: 150px;
}
.invalid {
border-color: red;
}
.submit {
background: linear-gradient(to right, #2e6ee1, #2e7ff1);
border: none;
color: white;
padding: 10px;
border-radius: 5px;
width: 100%;
cursor: pointer;
}
</style>
<label for="name">Name</label>
<input type="text" class="name" name="name" required><br><br>
<label for="email">Email</label>
<input type="email" class="email" name="email" required pattern="[a-z0-9._%+-]+@[a-z0-9.-]+\\.[a-z]{2,}$" title="Invalid email address"><br><br>
<label for="phone">Phone Number</label>
<input type="tel" class="phone" name="phone" required pattern="\\d+" title="Invalid phone number, please enter only numbers"><br><br>
<input type="submit" class="submit" value="Submit">
`;
formContainer.addEventListener('input', function () {
const name = formContainer.querySelector('.name');
const email = formContainer.querySelector('.email');
const phone = formContainer.querySelector('.phone');
if (name.checkValidity()) name.classList.remove('invalid');
if (email.checkValidity()) email.classList.remove('invalid');
if (phone.checkValidity()) phone.classList.remove('invalid');
});
formContainer.addEventListener('submit', function (event) {
event.preventDefault();
const name = formContainer.querySelector('.name');
const email = formContainer.querySelector('.email');
const phone = formContainer.querySelector('.phone');
if (
!name.checkValidity() ||
!email.checkValidity() ||
!phone.checkValidity()
) {
name.classList.add('invalid');
email.classList.add('invalid');
phone.classList.add('invalid');
return;
}
formContainer.querySelector('.submit').remove();
window.voiceflow.chat.interact({
type: 'complete',
payload: { name: name.value, email: email.value, phone: phone.value },
});
});
element.appendChild(formContainer);
},
};
</script>
Step 2: Register the extension
Update your chat.load() configuration to include the extension:
window.voiceflow.chat.load({
verify: { projectID: 'YOUR_PROJECT_ID' },
url: 'https://general-runtime.voiceflow.com',
assistant: {
extensions: [FormExtension]
}
});
Step 3: Trigger the extension from your workflow
Add a Custom action step to your workflow with the name Custom_Form. Create a path called complete and enable Stop on action so the agent waits for the form submission before continuing.
When triggered, your widget receives a trace that activates the extension:
{
"type": "Custom_Form",
"payload": "{}",
"defaultPath": 0,
"paths": [
{ "event": { "type": "complete" } }
]
}
Step 4: Retrieve the submitted values
After the form is submitted, the values are stored in the last_event system variable. Access them in a JavaScript step:
name = last_event.payload.name
email = last_event.payload.email
phone = last_event.payload.phone
More examples
For additional extension examples including video embeds, maps, input field controls, and confetti animations, visit the sample extensions repository.